1.0.1 BETA 1 · WINDOWS 64-BIT
Make yourself
road ready.
Install the program, connect your game and use GPS, the logbook and the built-in mod manager.
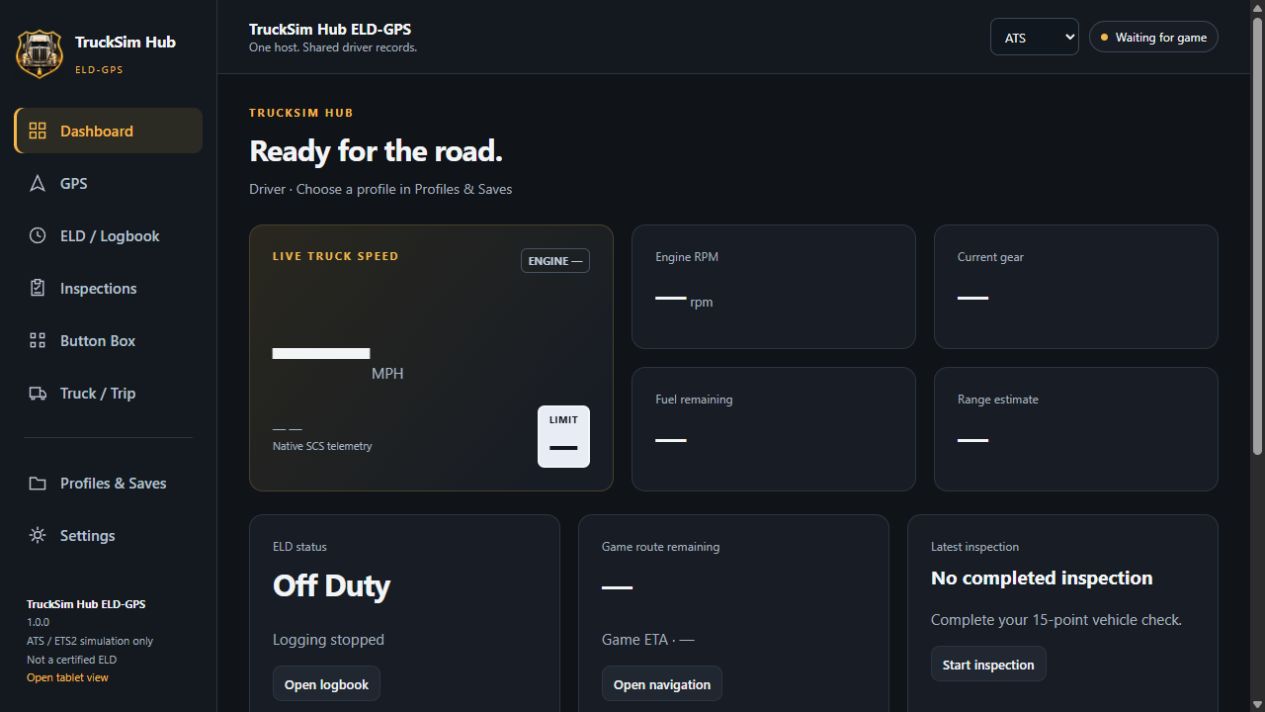
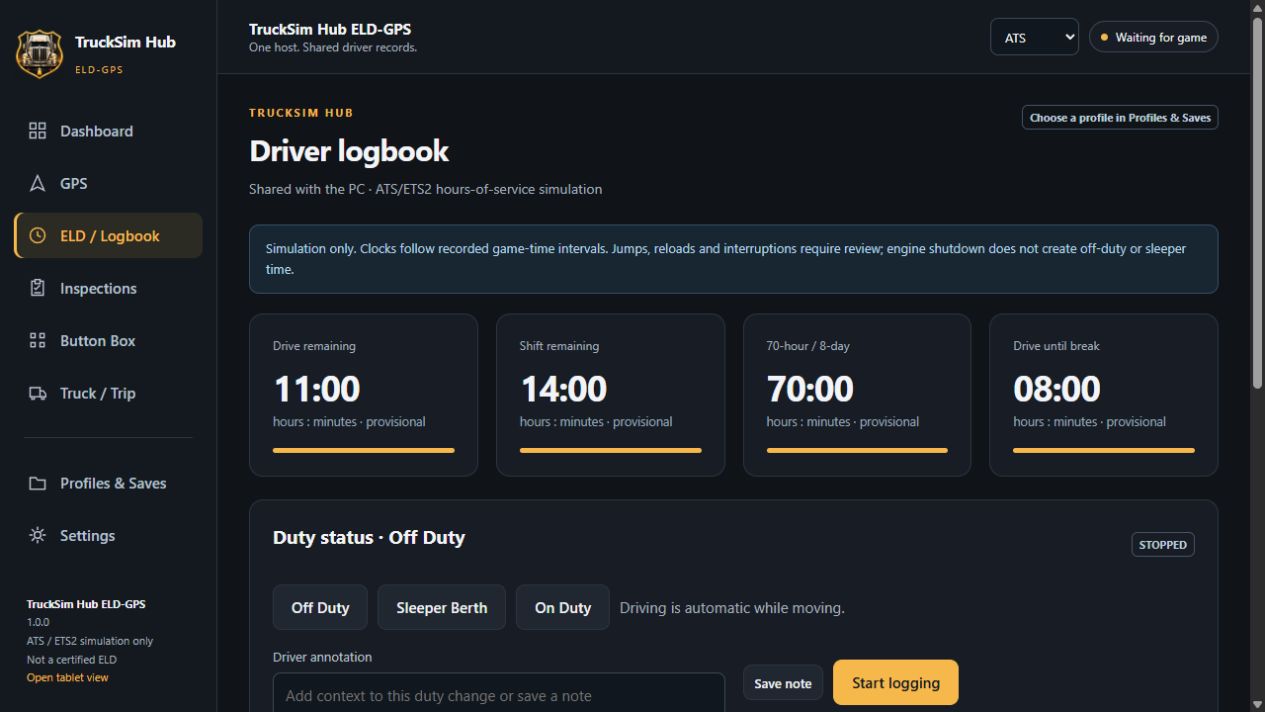
The closed beta is invitation only and requires Steam sign-in with an approved account. The 1.0.1 Beta 1 build is awaiting its final Windows startup and sign-in check; public downloads and purchases remain closed. Screenshots of the main tools show the retained 1.0.0 interface. Screenshots show that interface with illustrative records and no game connected. Mod names, compatibility results and backups are examples; these are not live-game tests.
Before you install
- Windows 10 or 11, 64-bit
- American Truck Simulator or Euro Truck Simulator 2
- Microsoft WebView2; initial setup may need an internet connection
- A trusted private network for optional tablet access
GPS route readers support specific game builds. If a game update is not supported, normal telemetry may still work while route following needs an update.
01 / INSTALL
Start on your gaming PC.
- Close an older TruckSim Hub ELD-GPS or ISL Driver Suite instance.
- Download the approved Windows release when it becomes available. The installer is named
TruckSim-Hub-ELD-GPS-1.0.1-Beta-1-Setup.exe. - Run Setup and follow the installation prompts. Allow the WebView2 installation if the runtime is missing.
- Open TruckSim Hub ELD-GPS from the desktop or Start menu.
- Choose Sign in with Steam. In your normal browser, sign in to the approved Steam account and choose Connect my ELD-GPS app. Return to the app and choose Open ELD-GPS when your license is verified.
The current installer is unsigned. Use the official download and verify its published SHA-256 before running it. Keep existing driver records when updating.
02 / CONNECT YOUR GAME
Choose your profile. Add telemetry.
- Use the game selector at the top to choose ATS or ETS2.
- Open Profiles & Saves and select the profile you actually drive. Check the mods folder when relevant.
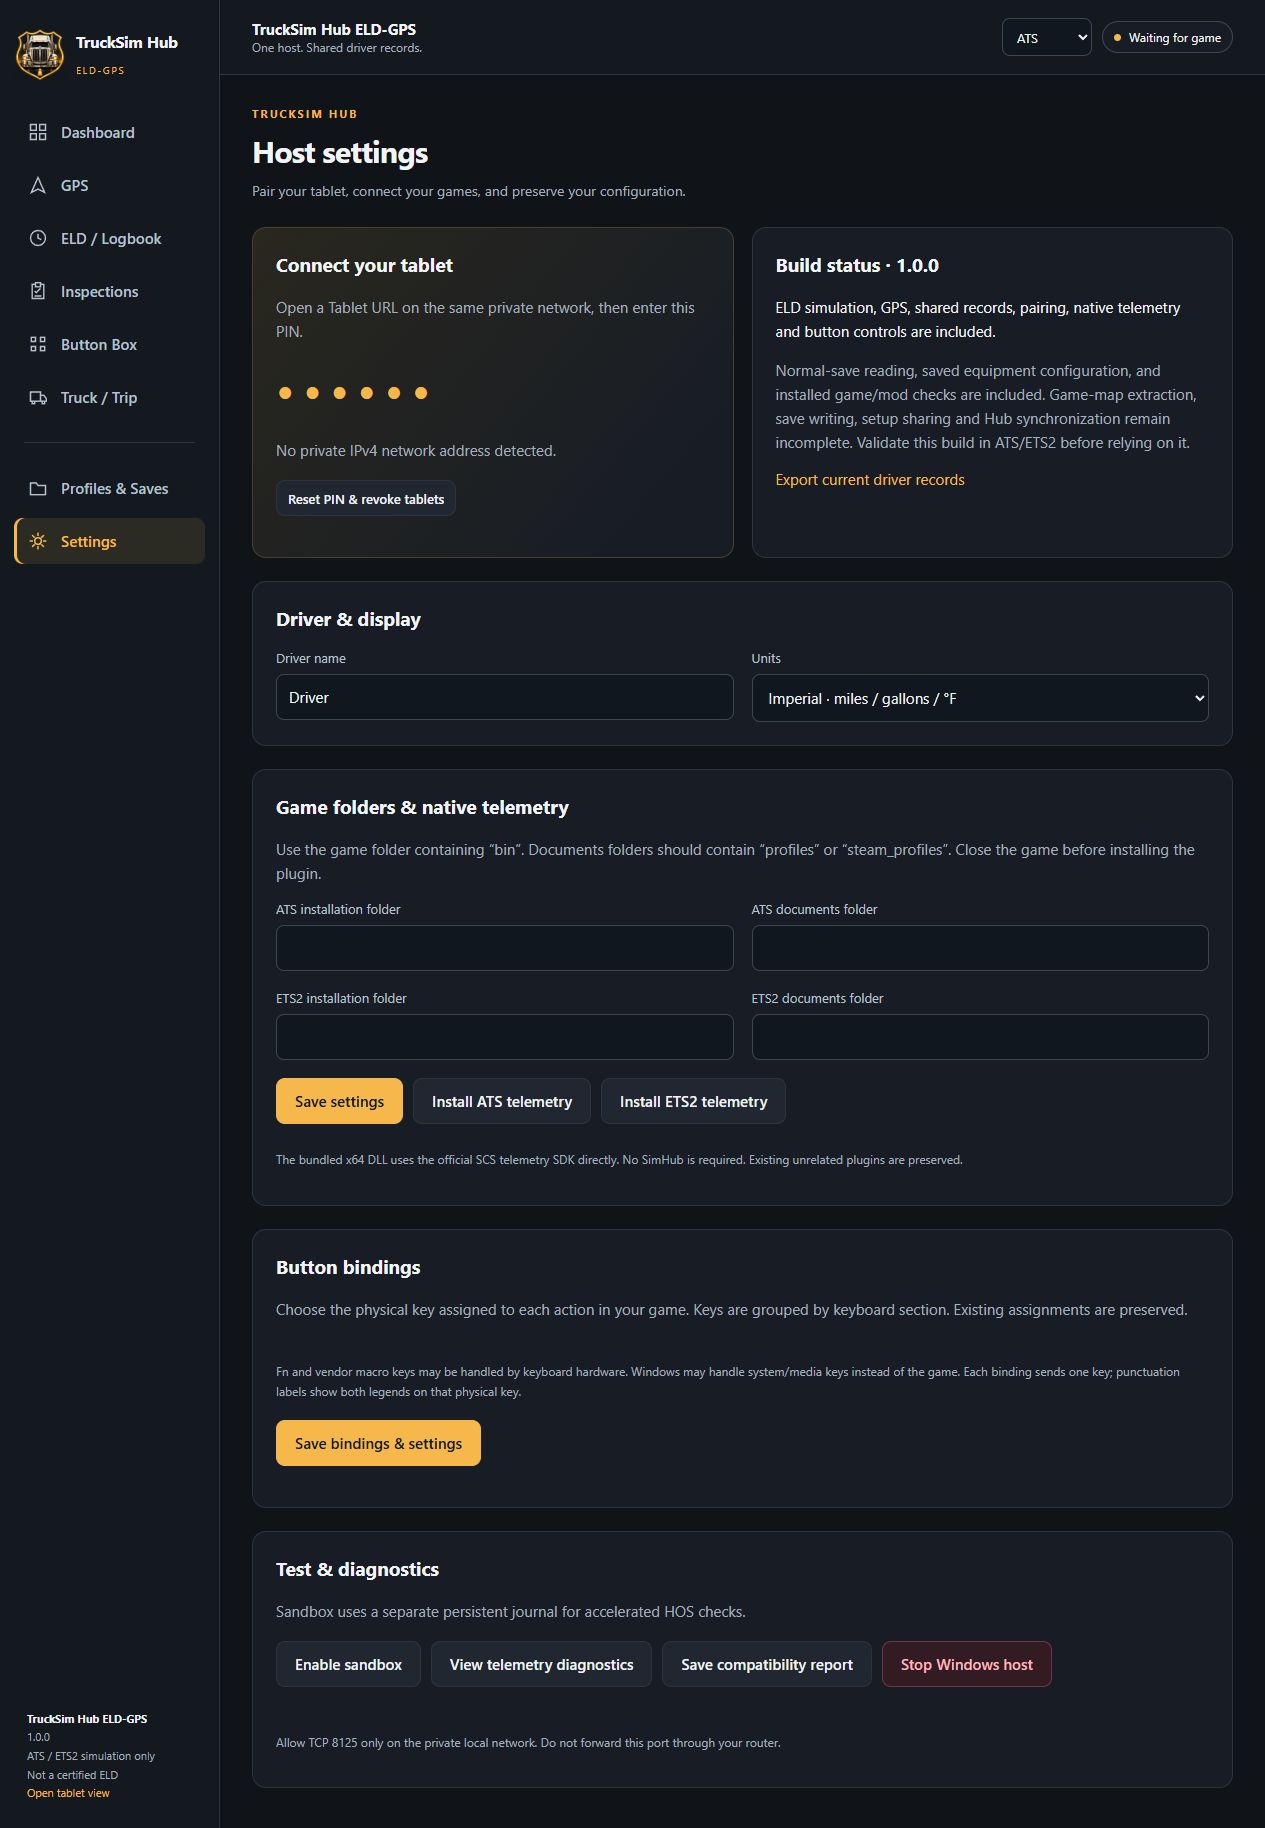
- With the game closed, open Settings → Game folders & native telemetry. The game folder should contain
bin; the documents folder should containprofilesorsteam_profiles. - Choose Install ATS telemetry or Install ETS2 telemetry.
- Start the game and accept its SCS SDK notice. Load the selected profile and watch the connection status.
Telemetry fields show “—” until the selected game supplies them. Paused and disconnected states are identified in the interface.
03 / MOD MANAGER
Your installed mods, in the order you choose.
Open Profiles & Saves → Mods to manage local mods and installed Steam Workshop packages for the selected ATS or ETS2 profile. You can enable, disable and reorder them, review compatibility notes, and restore an earlier selection.
Install the mod files or Steam Workshop subscriptions first. The manager works with packages already on your PC; importing a mod list does not download the mods themselves.
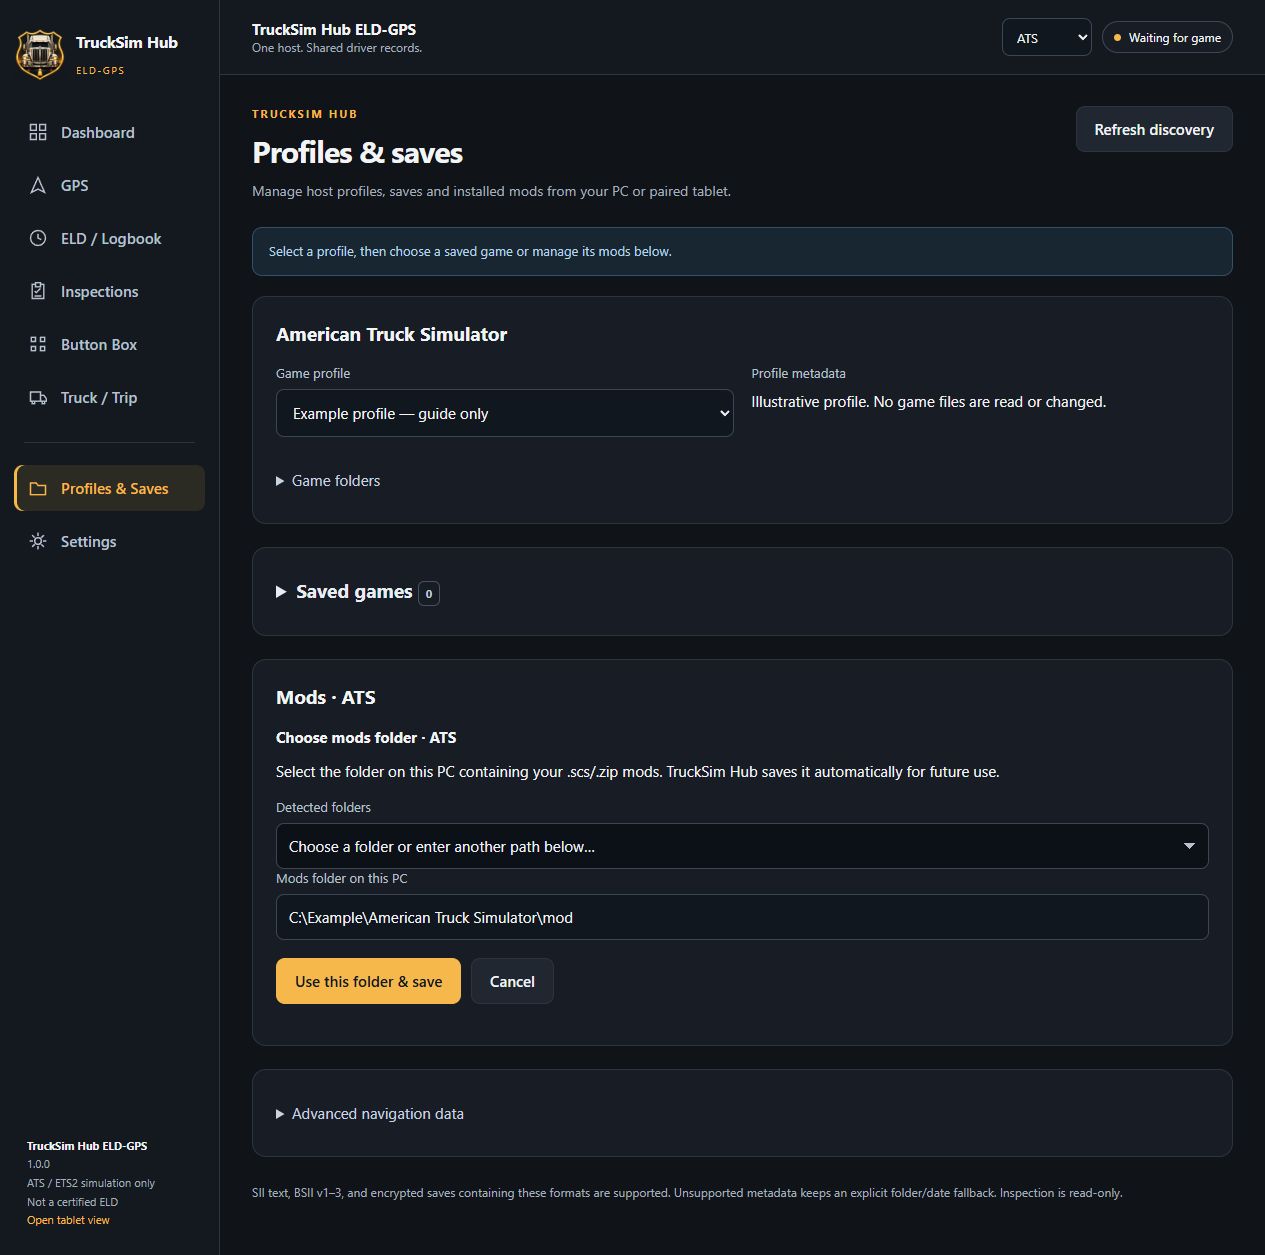
1. Choose your profile and mods folder
- Close ATS or ETS2 and let Steam Cloud or OneDrive finish syncing. Select the correct game and Game profile in Profiles & Saves.
- In Mods, choose a detected folder or paste the full path to the local mod folder your game actually uses. Then select Use this folder & save. Use Change mods folder later if needed.
- Choose the folder in the Windows app; paired tablets use that same PC folder. ATS and ETS2 keep separate folder choices. An existing empty local folder is accepted for a Workshop-only setup.
- Select Refresh from game to read the saved selection. If the game was running when the list opened, close it and refresh before arranging your draft.
Choosing a folder tells ELD-GPS where to look. It does not move mod files or change the game’s own folder settings.
2. Review and enable installed mods
- Use Find a mod to search by name or package ID. The compatibility buttons and filter narrow the list.
- In Available to enable, choose Details to review a package, then Enable in draft when the control is available.
- Use Disable beside an active mod to remove it from the draft. Disabling keeps its files installed and does not unsubscribe from Steam Workshop.
Compatible reflects the author’s declared game-version and DLC requirements; it does not guarantee that a combination of mods works together. Unknown means compatibility could not be verified. Read the mod author’s requirements and ordering instructions before applying changes.
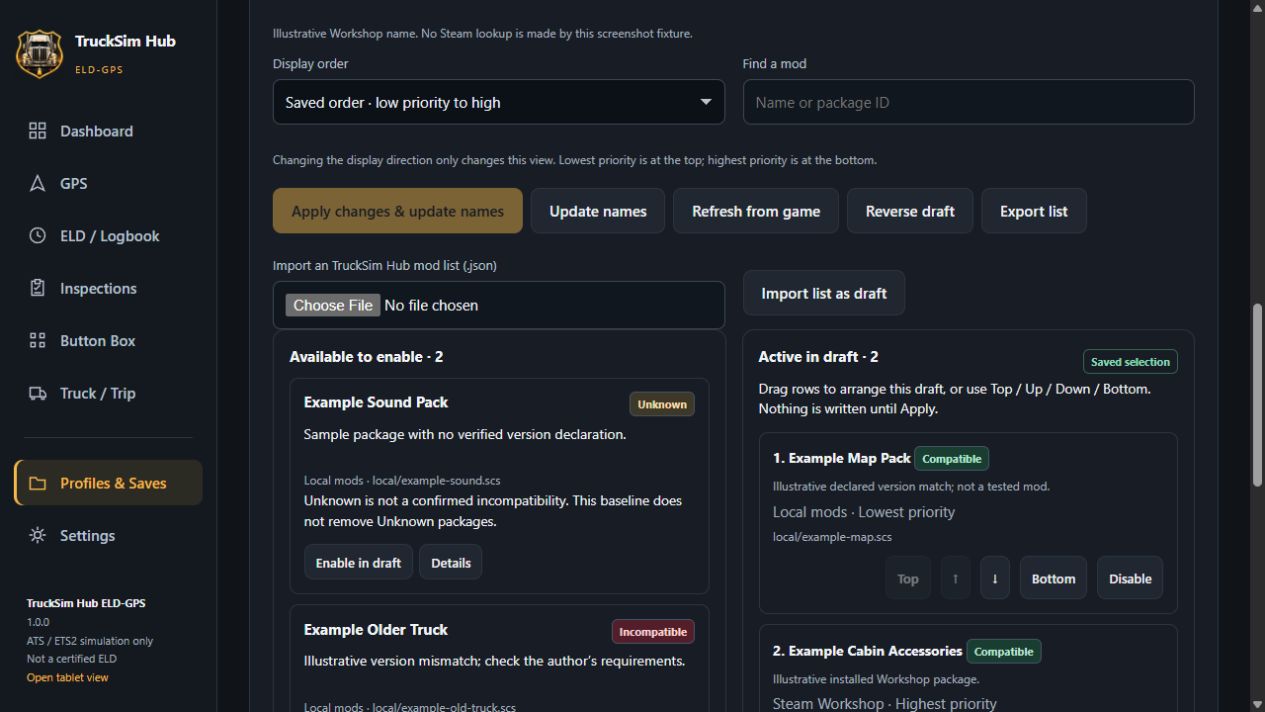
3. Arrange the draft and apply it
- Use Top, ↑, ↓ and Bottom to move an active mod. You can also drag active rows when the search and compatibility filters are cleared.
- The default Saved order · low priority to high view puts the lowest priority at the top and highest at the bottom. Reverse display only changes the view; Reverse draft changes the proposed order.
- Review the Unsaved indicator and your enabled, disabled and reordered mods. Choose Apply changes & update names, review the confirmation, then confirm with the game closed.
- The host backs up and updates the profile, then rebuilds city, company and cargo names. To abandon an unsaved draft, choose Discard draft & refresh.
Removing a required map, truck or cargo mod from a profile can affect saves that use it. Keep the author’s required dependencies and load order. After changing map mods, rebuild the road map in GPS; updating names alone does not rebuild roads.
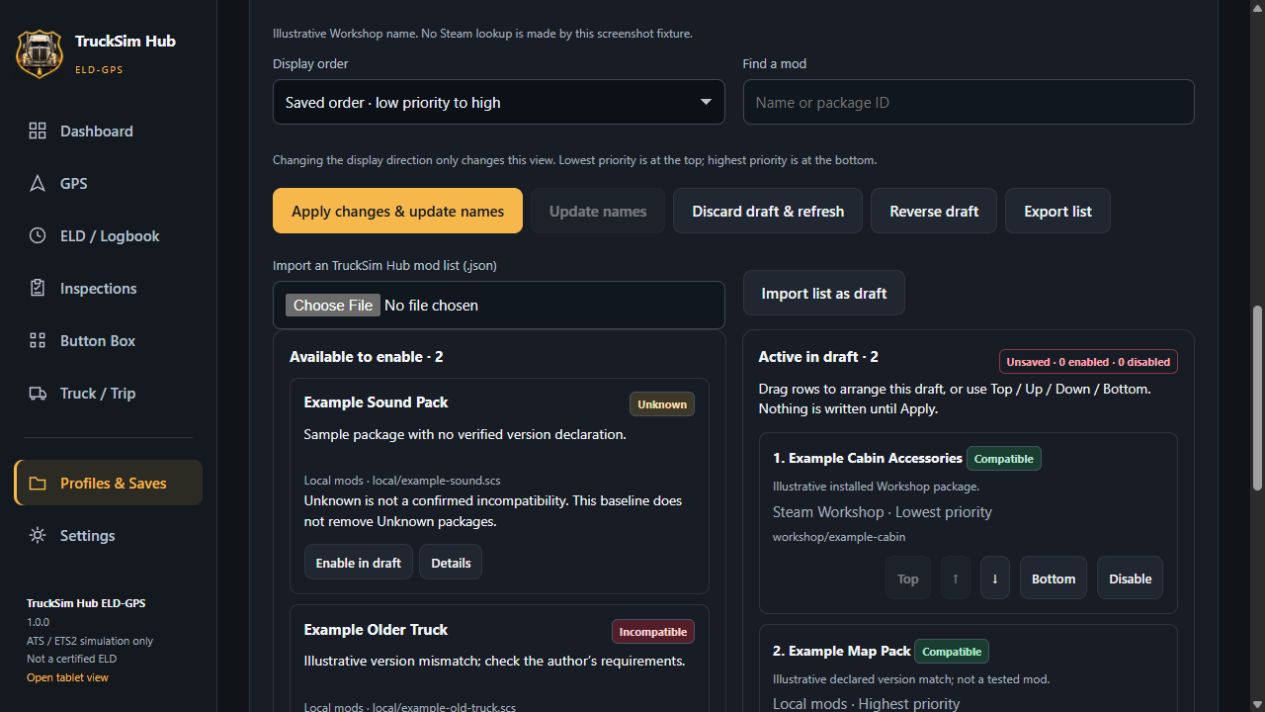
4. Export, import or restore a selection
- Export list saves the current selection and order, including an unsaved draft, as a JSON list. It does not include the mod packages.
- Choose a saved JSON file and select Import list as draft. Review the result and apply it to save. The selected game and installed packages must match the list.
- Expand Restore a previous mod selection, choose an available backup, then select Restore selection & update names with the game closed. This restores selection and priority while retaining current profile progress; mods being re-enabled must still be installed.
5. Remove or recover local files
Remove files… is available on the Windows host for local packages marked Incompatible. Disable an active mod and apply that change first, then review its removal in the available list. The host checks that no detected profile still uses it and that its files have not changed before allowing removal.
The confirmation moves the package to a recovery folder. To bring it back, expand Removed local mods, choose the package and select Restore mod files. Restoring files does not enable the mod; review it before enabling and applying it again. Workshop files remain managed by Steam.
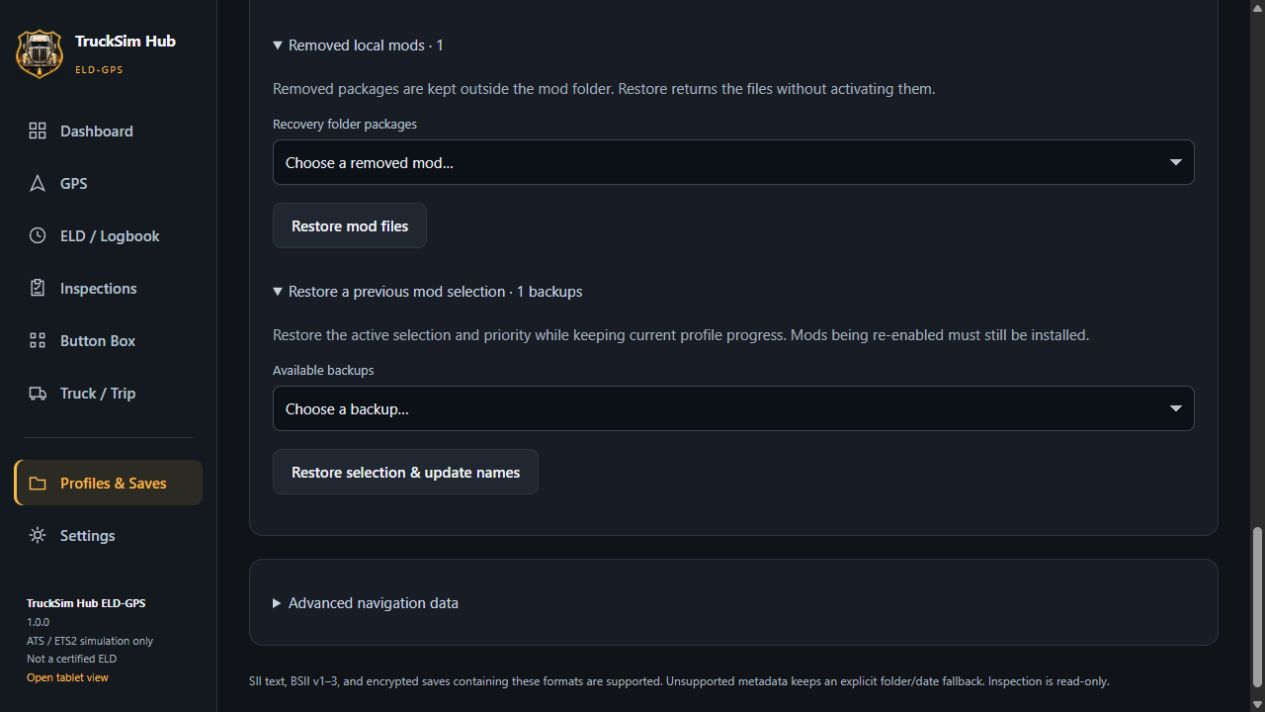
If the profile saves but the name rebuild fails, use Update names to retry. Apply or discard a pending draft first. For an unavailable folder or unmatched package, check the saved folder and Mod folders & discovery notes, then refresh.
04 / GPS NAVIGATION
Follow the route you set in game.
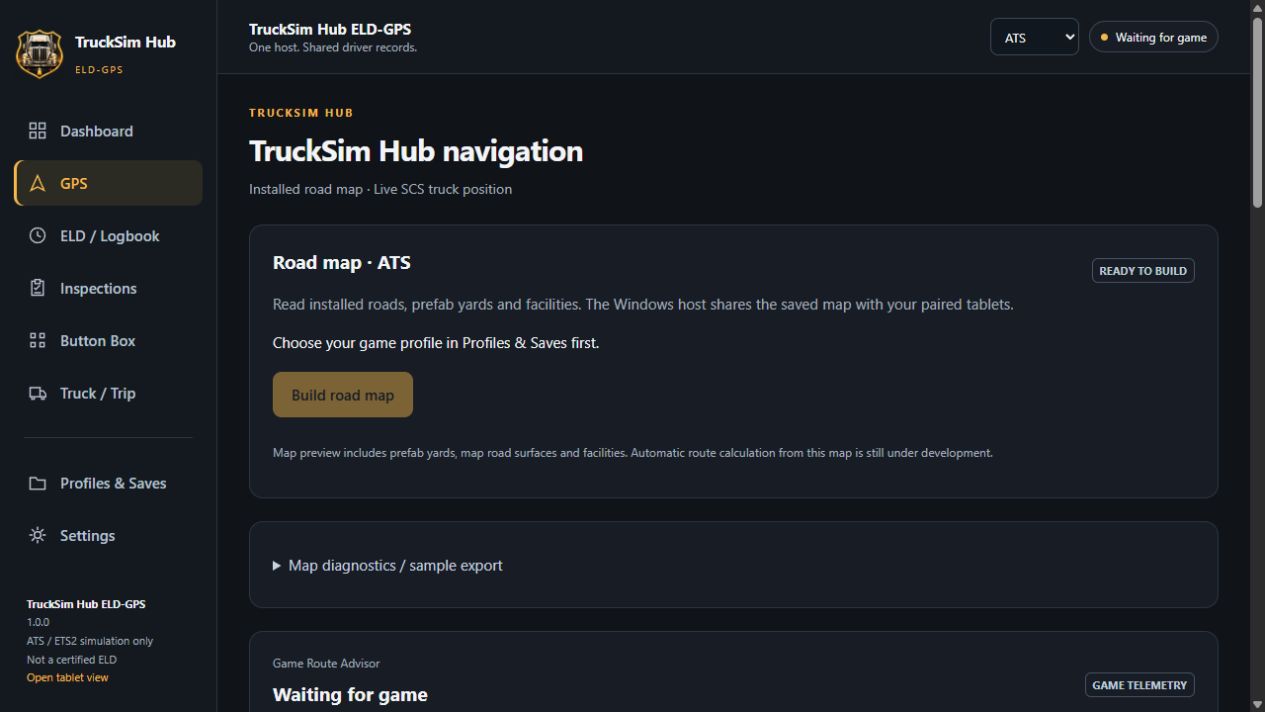
- Open GPS and select Build road map. This reads the installed game and active mods.
- Accept a job in ATS or ETS2 and select your destination in the game’s Route Advisor.
- Choose Follow game route in ELD-GPS. If route following is already active, its control reads Pause route following.
- Use Navigate to pickup or Navigate to delivery for the job’s current stage. These follow the selected in-game route; they do not change the game’s waypoints.
- Use Follow truck, zoom controls, North / heading and Full screen to adjust the view.
Build road map and Calculate route are different features. Independent route calculation needs validated routing data and can remain unavailable. The game’s Route Advisor remains the reference for your final loading or parking bay.
05 / ELD & INSPECTIONS
Keep your driver journal together.
- Open ELD / Logbook and confirm the selected game profile.
- Choose Start logging. Set Off Duty, Sleeper Berth or On Duty as appropriate. Driving is recorded automatically while moving.
- Add a driver annotation when you need context. Review time gaps after interruptions or game-time changes.
- Use the date selector to review duty history and Export shared records to save a copy.
- Open Inspections for a pre-trip or post-trip check. Complete each required item; defects and N/A results require item notes.
These are simulator records. Engine shutdown alone does not put the logbook Off Duty or into Sleeper Berth.
06 / TABLET ACCESS
Run the tablet display in your browser.
ELD-GPS runs in a web browser on your tablet, including Safari on iPad. You do not need to install a separate tablet app. Sign in through Steam on the Windows PC first. Tablets share that PC’s license and still use its pairing PIN. The Windows app must stay running on your gaming PC; it reads the game and stores the shared records.
- Connect your PC and tablet to the same trusted private network.
- Open Settings in the Windows app and find a listed Tablet URL.
- Enter that exact address in your tablet’s browser. On iPad, use Safari.
- Enter the pairing PIN shown on your PC. Reload the tablet page after updating the Windows app.
Add an iPad Home Screen shortcut
- In Safari, open the Tablet URL from the Windows app and finish pairing. Save this tablet display page, rather than the download website.
- Tap Share (the square with an upward arrow). If needed, tap More or View More, then choose Add to Home Screen. You may need to scroll through the actions.
- Name the shortcut TruckSim Hub ELD-GPS. If Safari offers Open as Web App, turn it on for an app-style window.
- Tap Add. The shortcut will appear on your iPad Home Screen.
- Tap the new icon whenever you want to open ELD-GPS. Keep the Windows app running and both devices on the same network; enter the pairing PIN again if prompted.
If your PC’s Tablet URL changes, open the new address from Settings in Safari and create a new shortcut. The shortcut still connects to your PC; it does not make ELD-GPS available offline.
Apple’s guide to adding a website to the iPad Home Screen
Do not expose port 8125 to the public internet.
07 / STEAM LICENSING
Your Steam account is your license identity.
Steam is the only registration and sign-in method. The closed beta is invitation only and restricted to approved Steam accounts. Registering with Steam alone does not grant beta access.
- Sign in to TruckSim Hub with Steam and choose your driver name.
- Open the invitation link from the project manager, use the invited Steam account, and choose Accept beta invitation.
- Open My account to download the approved Windows beta installer.
- In the Windows app, choose Sign in with Steam. Your normal browser opens the Hub.
- Use the approved Steam account and choose Connect my ELD-GPS app. Only approve a connection you just started on your own PC.
- Return to the app and choose Open ELD-GPS once the license check succeeds.
No email registration or activation code is required. Keep the PC online: the app checks the Hub regularly. Revoking a grant blocks new app requests within 30 seconds. A PC connection lasts up to 90 days before Steam sign-in is required again; signing in again does not change your license.
To switch accounts or disconnect a PC, choose Steam license at the bottom of the app sidebar, then Sign out of this PC. Tablets use the licensed Windows host and its normal pairing PIN.
Planned public editions
The future free edition will allow three completed GPS deliveries per Steam account in a rolling 24-hour window. Paid plans are $10 USD per month or $50 USD lifetime with PayPal. These editions and purchases remain closed while billing and the daily allowance are completed.
Use the 1.0.1 Beta 1 installer for Steam licensing. Older 1.0.0 packages do not check Hub grants. Final Windows startup, Steam sign-in and live-game verification remain before wider beta distribution.